

From Patch Test to Proven Results: A Practical At‑Home Framework for Comparing Peptide Serums, Prebiotics & Scalp Devices to Boost Hair Density
Updated for 2025 — if you want to improve hair density, the market offers dozens of peptide serums, prebiotic scalp treatments, and mechanical stimulation devices. But without a structured testing plan you’ll be left guessing which product or combination truly helps your hair. This comprehensive, step‑by‑step at‑home framework walks you through safe patch testing, rigorous baseline collection, controlled trial designs, objective measurement, data analysis, and practical tips for combining approaches. You’ll learn how to design 12–24 week comparisons to discover what actually moves the needle on your hair density.
Why a repeatable method matters
Hair growth is influenced by long biological cycles (the hair growth cycle), hormones, nutrition, stress, styling damage, seasonal variance, and age. Marketing often promises quick fixes; real change is slow. A repeatable method helps you separate real effects from noise and protects you from false positives. This framework is designed for home use but is rigorous enough to give you actionable insights.
What you can realistically expect
- Initial scalp responses (reduced irritation, change in oiliness) may occur within days to weeks.
- Measurable improvements in hair density typically require at least 12 weeks; 16–24 weeks is common for clearer results.
- Devices that mechanically stimulate follicles or enhance blood flow also take multiple months to show effects on density.
The science in brief: peptides, prebiotics, and devices
Understanding how each class works helps you design tests and interpret results.
- Peptide serums: short chains of amino acids designed to mimic natural signaling molecules. Some peptides claim to stimulate dermal papilla activity, increase keratin production, or support follicle health. Look for formulations with stable peptides and supportive carriers.
- Prebiotic scalp treatments: aim to support a healthy microbiome on the scalp by nourishing beneficial microbes and limiting opportunistic species. Improved scalp environment can reduce inflammation and create better conditions for hair growth.
- Scalp stimulation devices: mechanical massage devices or low‑energy stimulators (including microneedling and LED/laser systems) can increase blood flow, modulate inflammatory signals, and in some studies support follicle rejuvenation. Device protocols matter — frequency, pressure, and needle depth (for microneedling) change outcomes.
Step 1 — Safety first: patch test and scalp spot test
Always start small.
- Patch test on the inner forearm or behind the ear. Apply the product and leave uncovered for 48–72 hours; check for redness, itching, blistering, or delayed reactions.
- If no reaction, do a small scalp spot test (coin‑sized area behind your hairline) and observe for 7 days for any irritation.
- For devices, follow manufacturer instructions; start with lower intensity/frequency to assess tolerance. If microneedling, ensure single‑use or properly sterilized needles and avoid aggressive settings without professional guidance.
Step 2 — Baseline week: document everything
Collect consistent baseline data for 7–14 days before starting any intervention.
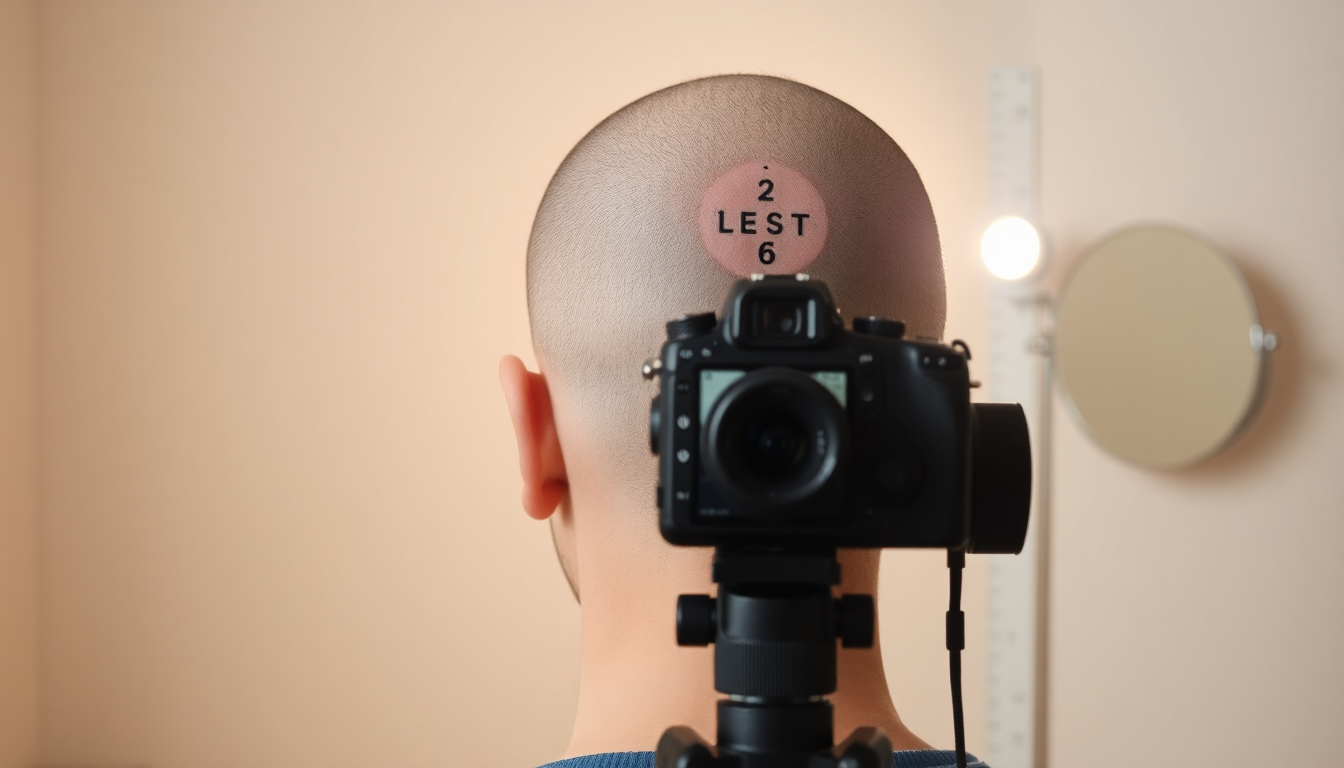
- Standardized photos: take at least 3 angles (vertex, crown, frontal) with the same camera, lighting, hair wet/dry state, and distance. Use a tripod or fixed mount and the same background.
- Marked hair count: choose a 1 cm² area and mark the scalp lightly (with removable sticker or washable marker) to count hairs visible at baseline.
- Shedding log: after two consecutive normal washes, collect and count shed hairs from the drain and towel to create a baseline weekly average.
- Lifestyle and product log: record diet changes, supplements, medications, stress, sleep, haircuts, and heat styling usage.
- Subjective ratings: weekly scores (0–10) for perceived density, scalp itchiness, oiliness, and overall satisfaction.
Step 3 — Choose the right comparison design
Pick the trial design that fits your products and lifestyle.
- Split‑scalp (within‑subject) design: apply Product A to one side and Product B to the other. This controls for systemic factors (hormones, diet). Best when testing two topicals or a topical vs placebo. Use clear marking to prevent crossover.
- Sequential single‑product design: use Product A for a fixed period, then a washout period, then Product B. Good for testing a device that must be used across the whole scalp or for more than two products.
- Hybrid design for three interventions: combine split‑scalp for two topical products while applying the device only to one side; or run three sequential phases (peptide, washout, prebiotic, washout, device).
When in doubt, choose split‑scalp for topicals and sequential for devices.
Step 4 — Protocols and application fidelity
Consistency is crucial. Minor changes in application can confound results.
- Use the recommended amount and frequency: follow label instructions (eg. once daily, twice daily) and document exact timing.
- Keep other products constant: same shampoo, conditioner, styling routine, and heat tools during the trial period.
- For devices: record settings, duration, and exact days used. Avoid overlapping sessions with exfoliating acids or harsh treatments.
- Avoid major lifestyle changes during trials (new medications, rigorous diet changes, or extreme stressors) when possible.
Step 5 — Measurement: objective, photographic & subjective
Gather multiple measures to strengthen conclusions.
- Hair count in marked 1 cm² area: the most objective home metric — perform weekly or biweekly counts.
- Standardized photography: crop to the marked area and save full‑resolution images. Use image software to overlay before/after.
- Shedding per wash: count hairs collected after washing to monitor changes in telogen shedding.
- Trichoscope or magnifier: if available, attachable phone magnifiers or low‑cost trichoscopes help measure shaft diameter and miniaturization patterns.
- Subjective scales: weekly ratings for perceived thickness, visible density, and personal confidence.
Step 6 — Data logging templates and tools
Use a simple spreadsheet or habit app to log data. Example columns:
- Date
- Product/device used
- Photo file name
- Hair count (1 cm²)
- Shedding count
- Subjective score (density, thickness)
- Side effects/notes
Apps and tools that help:
- Photo comparison apps that allow overlays
- Phone tripod and ring light for consistent imagery
- Digital caliper or measuring grid stickers for 1 cm² accuracy
- Simple spreadsheet or Google Sheets shared with a friend if you want remote blinding
Step 7 — Analysis: how to interpret results
At the end of each treatment phase, analyze multiple metrics together.
- Percent change in hair count: (final – baseline) / baseline × 100.
- Change in average weekly shedding.
- Photo comparison: look for consistent, visible changes in the marked area using cropping and overlay tools.
- Subjective changes: weigh these alongside objective measures — perceived improvements often drive continued use.
- Look for consistent trends across at least 2 metrics (e.g., hair count and photos) before declaring a win.
Troubleshooting common issues
- No visible change: extend the trial to 16–24 weeks — some effects take longer. Check application fidelity and product integrity (expire date, storage).
- Irritation: stop the product, treat symptoms (gentle cleansing, barrier repair creams), and consult a dermatologist if severe.
- High variability in counts: ensure the marking method is identical, and consider having a second person count blinded to reduce bias.
- Device discomfort: lower intensity and frequency; get professional guidance for microneedling depths above home‑use recommendations.
Combining treatments: synergy vs. confounding
Combining a peptide serum with a prebiotic spray and a device can be a powerful approach, but it complicates attribution. Recommended approaches:
- Start with single interventions to identify an effective base.
- If combining, add one new element at a time and monitor for incremental benefit over 8–12 weeks.
- Always patch test combinations and monitor for enhanced irritation when two active approaches are used together.
Case study examples (hypothetical) — how the framework plays out
Example A — Split‑scalp peptide vs placebo, 16 weeks:
- Baseline hair count: left 35/1 cm², right 36/1 cm².
- After 16 weeks: left (peptide) 42 (+20%), right (placebo) 37 (+2.8%).
- Shedding decreased on left by 25%, photos show increased apparent fullness. Decision: continue peptide on full scalp.
Example B — Sequential prebiotic then device, 24 weeks:
- Weeks 0–12: prebiotic spray — mild reduction in itching and 8% increase in hair count.
- Weeks 13–24: added device to whole scalp — additional 15% increase and notable improvement in hair shaft thickness.
- Decision: maintain combined regimen, monitor long‑term.
Choosing products: what to look for in serums and prebiotics
Key product selection criteria:
- Transparent ingredient lists and concentrations — brands that publish active concentrations make meaningful comparisons easier.
- Third‑party testing or clinical trial summaries — look for evidence of efficacy and safety.
- Supportive formulation (pH, excipients) that stabilizes peptides and supports skin barrier.
- For prebiotics: look for oligosaccharides, inulin, or other documented prebiotic ingredients tailored for scalp microbiome support.
Curated options and transparent formulations can reduce guesswork. For example, explore Eelhoe peptide serums and prebiotic scalp treatments that list actives and recommended use: Eelhoe peptide serums and Eelhoe prebiotic scalp treatments for more details on ingredient breakdowns and usage guidelines.
Device selection and safe home use
- For massage devices, choose models with adjustable intensity and documented safety.
- For microneedling, stick to professional advice — most home devices use short needles (0.25–0.5 mm) and require careful hygiene.
- For LED/laser devices, verify regulatory clearance (such as FDA clearance in relevant regions) and use as directed for session length and frequency.
When combining a topical with a device, wait the recommended time after device use before applying active serums (or follow product instructions) to minimize irritation risk.
Extended FAQ — deeper answers
- How long should I wait between switching products? Allow for a 4–6 week washout where possible, though full biological washout may take longer. For clear attribution, sequential phases of 12+ weeks are ideal.
- Can I test on colored or chemically treated hair? Yes, but chemical treatments can impact scalp health and hair strength; keep treatments constant during the trial.
- What if I use oral supplements? Keep supplement use constant during trials, or pause them during the baseline if medically appropriate and in consultation with your clinician.
Checklist: 12–16 week at‑home comparison plan
- Complete patch testing for each new product
- Collect 1–2 weeks of baseline photos and counts
- Decide split vs sequential design and mark scalp accordingly
- Use product/device per exact protocol and log usage
- Take weekly photos, perform counts, and log shedding/subjective scores
- Analyze at week 12 and again at week 16; extend to 24 if needed
Practical tips to reduce bias and improve accuracy
- Blind the rater: have a friend apply products and record which side is which in a sealed note to be opened after final scoring.
- Use objective counts wherever possible; subjective impressions are helpful but secondary.
- Keep lighting and camera settings identical across all photos.
- Repeat positive findings: if a product shows benefit, re‑run or extend the test after a washout to confirm.
Resources and further reading
- Basic trichology primer — understanding hair cycles and miniaturization
- Guidelines for home microneedling and device safety
- Scalp microbiome research summaries on prebiotics and skin health
Illustrations and image suggestions (what to capture)
- Patch test image: inner forearm application with date stamp (alt='patch test for peptide serum hair density')
- Baseline photo set: vertex, crown, frontal (alt='baseline scalp photo hair density')
- Marked 1 cm² grid close‑up for hair counts (alt='1 cm2 hair count grid scalp')
- Device usage action shot showing distance and positioning (alt='scalp stimulation device for hair density')
- Product application: dropper applying peptide serum to marked area (alt='peptide serum application for hair density')
Ethics, safety and when to consult a professional
This framework is informational. If you experience sudden rapid hair loss, scalp pain, signs of infection, or systemic symptoms, stop use and consult a dermatologist or healthcare professional. If you have an underlying medical condition (thyroid disease, autoimmune disease), talk to your clinician before starting new topical regimens or devices.
Conclusion — evidence over anecdotes
With a structured at‑home protocol you can move beyond trial‑and‑error. Patch test, document a reliable baseline, choose a study design that fits the intervention, and commit to consistent application and measurement for 12–24 weeks. Use objective hair counts, standardized photography, shedding logs, and subjective ratings together to form a complete picture. Repeat and confirm promising findings before making long‑term changes.
If you’re ready to try curated, transparent peptide serums or prebiotic scalp treatments to start a controlled trial, explore the product range at Eelhoe Cosmetics. Their pages provide ingredient breakdowns and usage instructions to help you integrate new treatments into a measured 12–24 week testing plan. Start with a patch test and follow the checklist above — then decide based on your documented results whether to adopt, combine, or discard a product.
Disclaimer: This article provides general information and is not medical advice. Consult a qualified healthcare professional for personalized recommendations and before starting new treatments, especially if you have existing medical conditions.
اترك تعليقًا
تخضع جميع التعليقات للإشراف قبل نشرها.
This site is protected by hCaptcha and the hCaptcha Privacy Policy and Terms of Service apply.