

Introduction
If you are experimenting with peptide serums, prebiotic scalp treatments or at‑home scalp devices, subjective impressions only take you so far. This extended guide teaches a repeatable, evidence‑minded imaging and density scoring workflow you can perform at home. You will learn how to capture reproducible images, convert them into measurable metrics, compare treatments fairly, and interpret results meaningfully over weeks and months.
Executive Summary
- Set up consistent imaging with a phone, macro lens and fixed lighting.
- Use the Scalp Imaging & Density Score (SIDS) to combine hair count, diameter, coverage and scalp health into a 0–100 index.
- Test a single variable at a time, document protocols and follow at least 12 weeks for hair density outcomes.
- Use simple free tools like ImageJ and a spreadsheet to quantify change and visualize trends.
- If you want product ideas to test, consider looking at curated peptide serums and prebiotic scalp treatments such as those available from Eelhoe; links are included below for convenience.
Why Objective Quantification Matters
People naturally overestimate or underestimate product effects due to expectation, wishful thinking, seasonal variations and hair styling. Objective measures help you:
- Detect real, clinically meaningful change versus noise.
- Compare two or more interventions fairly.
- Decide whether a product is cost effective for you.
- Create a personal dataset useful for consultations with dermatologists or trichologists.
Essential Equipment & Budget Options
Choose tools based on budget. The protocol scales from very low cost to more advanced setups.
- Phone camera: modern smartphones have adequate resolution; seek one with manual focus and exposure controls if possible.
- Macro lens clip: low cost, 15–60x options. Good for close focus and surface detail.
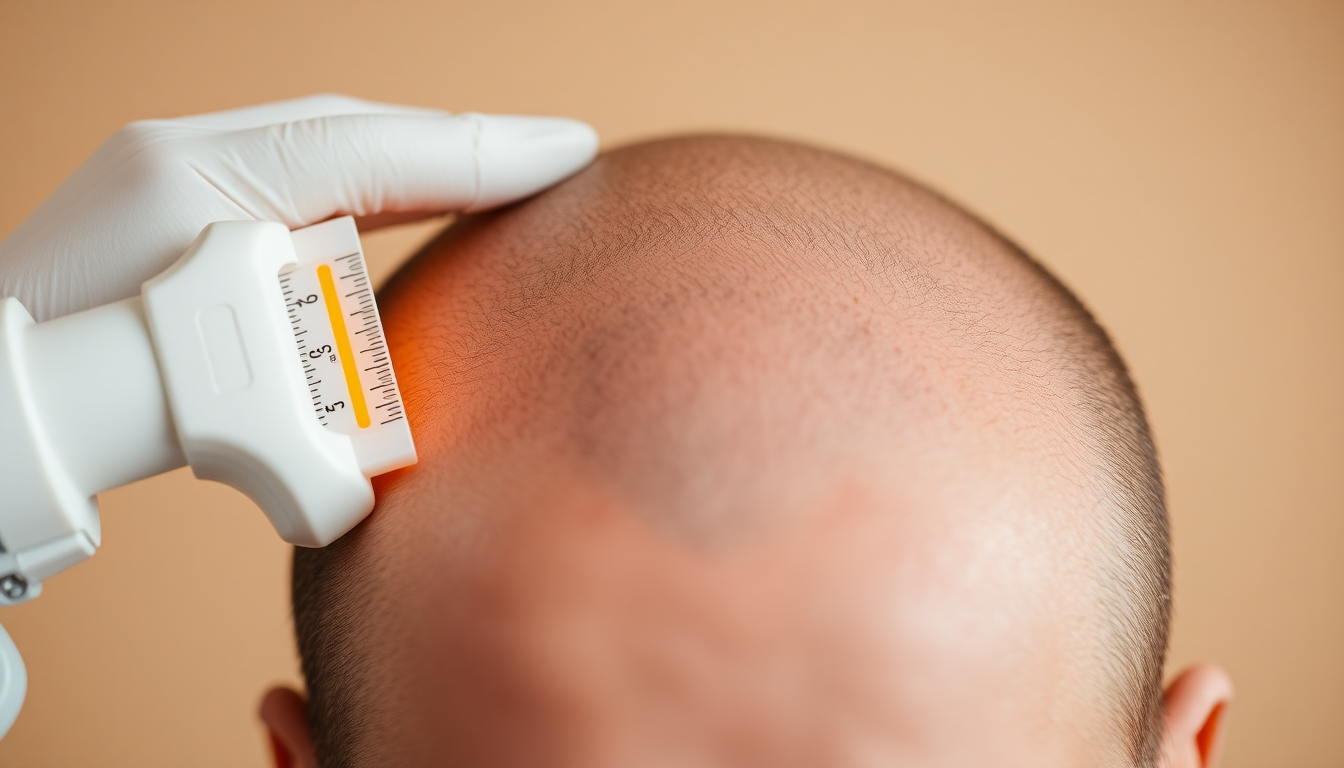
- Handheld dermatoscope or USB microscope: optional for accurate diameter measurements and vellus hair detection.
- Ring light or LED panel: consistent, diffuse lighting reduces shadows and improves thresholding.
- Small centimeter ruler or 1 cm sticker grid: essential for scale calibration.
- Phone tripod or stable mount and small headrest for the subject to keep angle consistent.
- Software: free ImageJ/FIJI for image analysis, any spreadsheet application for scoring, and basic photo apps for cropping and white balance.
Standardized Imaging Protocol — Step by Step
Reproducibility is the most important single factor. Document each element and keep it fixed across all sessions.
- Choose and mark three repeatable sites: frontal hairline (1–2 cm behind), central vertex (crown), and a lateral area. Use a water‑soluble marker or record distance from an ear/brow point.
- Decide on state at imaging: natural oil level or clean washed scalp. Be consistent. For many trials, use post‑wash images taken 24 hours after washing to minimize transient oil. Record the choice.
- Position subject with head against a consistent backdrop and steady headrest. Use the same chair/height each time.
- Set camera manual exposure, fixed white balance, and fixed focal distance if possible. Place the ruler in the plane of the scalp so scale is accurate.
- Use the ring light at the same intensity and angle. Avoid strong directional light that creates specular highlights.
- Take 3 images per site and pick the sharpest. Use a remote shutter or timer to avoid motion blur.
- Name image files with a consistent convention including date, site and treatment arm; example: 2025-10-01_vertex_peptide-left.jpg. Blinded scoring later requires anonymized file names.
- Image cadence: baseline, 4 weeks, 8 weeks, 12 weeks, then monthly. For devices or peptides, expect signals by 12 weeks; microbiome/prebiotic benefits on scalp health may appear in 4–8 weeks.
The Scalp Imaging & Density Score (SIDS) — A Reproducible Composite
SIDS puts multiple measurable aspects into a single 0–100 index that is easy to calculate and track over time.
- Hair Density (HD) 0–40: count hairs in a 1 cm2 area. Convert absolute count to a 0–40 metric where higher counts give higher scores.
- Average Diameter (AD) 0–20: measure diameter of a representative set of hairs, average, and convert to a 0–20 scale.
- Coverage / Visible Scalp (VC) 0–20: use pixel thresholding to estimate percent scalp visible in frame; fewer visible scalp pixels = higher points.
- Scalp Health (SH) 0–10: an observer score for redness, flaking and oiliness.
- Growth Activity (GA) 0–10: percent of short new hairs or presence of growth stubble indicating anagen recovery.
SIDS = HD + AD + VC + SH + GA. Track each component as well as composite SIDS for a full picture.
Detailed Measurement Methods
How to obtain reliable numbers for each SIDS component.
- HD (Hair Density): open image in ImageJ. Calibrate scale using the ruler. Draw a 1 cm2 square and use the cell counter plugin to click each visible shaft. If using manual count, zoom and mark counted hairs to avoid duplication. Count vellus separately if desired.
- AD (Average Diameter): with dermatoscope or high magnification, measure diameter of 10–20 representative hairs using the line measurement tool. Average and convert to scale. Example mapping: <30 microns = 0, 30–50 = 5–10, 50–70 = 10–15, >70 = 20.
- VC (Coverage): threshold the image to separate hair pixels from scalp pixels. Measure percent scalp area and invert to a 0–20 score. Example: 0% visible scalp = 20, 50% visible scalp = 10, 100% visible scalp = 0.
- SH (Scalp Health): use a checklist scored numerically. For example, no redness/flakes/oil = 10, mild flaking = 7, moderate = 4, severe = 0. Photograph signs for documentation.
- GA (Growth Activity): count short hairs <1.5 cm and divide by total hairs in the frame. Map percentage to 0–10 scale (higher percent new hairs = higher score).
Spreadsheet Template & Example Calculations
Create a simple spreadsheet with columns for subject id, date, site, HD, AD, VC, SH, GA, SIDS, and notes. Add formula cells to compute percentage change from baseline and plot trends.
Example formula ideas:
- SIDS = SUM(HD, AD, VC, SH, GA)
- Pct change from baseline = (SIDS_current - SIDS_baseline) / SIDS_baseline * 100
- Absolute change = SIDS_current - SIDS_baseline
Visualize with a line chart for SIDS over time and bar charts to show component contributions. Plotting component trajectories helps reveal whether a product improves scalp health first, then density, or vice versa.
Designing Fair Head‑to‑Head Comparisons
To compare two products, control every variable except the active being tested.
- Within‑subject split‑scalp designs are powerful: apply product A to the left lateral site and product B to the right lateral site, leaving vertex as neutral control.
- If you must do separate subjects, ensure matching on age, sex, baseline SIDS and hair length.
- Keep grooming, frequency of washing, temperature, haircuts and topical steroid use consistent and documented.
- Use blinded scoring by renaming images with random codes before analysis to reduce bias.
Statistical & Practical Considerations for N=1 and Small Groups
Most home experiments are small. Here are pragmatic tips:
- Repeat measurements to reduce random noise; take three images per site and use the median value.
- Use percent change rather than absolute change when baseline values differ between sites.
- Report both absolute hair count change and percentage change. A +10 hairs/cm2 may be more meaningful if baseline was very low.
- Consider simple paired tests like the Wilcoxon signed‑rank if you have repeated measures across subjects and want basic statistical support.
- Remember that clinical significance depends on the person: cosmetic improvement may be meaningful even with small counts if coverage improves.
Common Artifacts & How to Avoid Them
- Lighting variations: fix lighting and color temperature using manual white balance or include a white card in every photo for later correction.
- Specular highlights: diffuse light with a softbox or ring light; avoid direct phone flash.
- Hair parting differences: always part hair the same way or use a combed down state for coverage images.
- Shadowing from the person taking the photo: ensure the light source is behind the camera to minimize shadows on the scalp.
- Scale inconsistencies: include the ruler in the same plane as scalp to avoid parallax errors when measuring diameter or area.
Case Studies — Realistic Timelines & Outcomes
These example scenarios illustrate expected timelines and interpretations.
- Peptide Serum (Copper peptides/acetyl tetrapeptide): expect scalp health improvements in 4–8 weeks and density gains at 12–24 weeks. Example outcome: baseline SIDS 48, 12‑week SIDS 62, HD +12 hairs/cm2, AD +1 measurement band.
- Prebiotic Scalp Treatment: quicker improvements in scalp health and reduced flaking or dandruff in 2–6 weeks; density changes may be delayed. Example: baseline SIDS 50, 8‑week SIDS 58 driven by SH and VC improvements.
- Low‑Level Light Therapy Device: many studies show measurable density increases after 12–24 weeks; user adherence is critical. Example: baseline SIDS 45, 16‑week SIDS 59, GA notably increased.
Combining Treatments: Synergy or Noise?
Combination therapy can be effective but make sure you understand which component drives improvement.
- Start with one treatment and establish a 12‑week baseline response before adding another.
- If combining a peptide serum and a prebiotic, apply them at different times to avoid potential interactions and track each site's SIDS closely.
- Document unexpected interactions like increased irritation or shedding and pause the regimen if severe reactions occur.
Choosing Products to Test
Select products with transparent ingredient lists, clear usage instructions and, ideally, some clinical evidence. Prioritize one variable at a time—either a new serum OR a device rather than both simultaneously.
- Peptide serums: look for well‑studied actives such as copper peptides and acetyl tetrapeptide and stable formulations suitable for twice‑daily application.
- Prebiotic scalp treatments: search for inulin, oligosaccharides or ingredients aiming to support the scalp microbiome and reduce inflammation.
- Scalp devices: compare low‑level laser/LED devices and mechanical massagers. Confirm recommended session length and adherence expectations.
For curated product ideas, consider reviewing targeted formulations like peptide serums and prebiotic scalp treatments crafted for scalp regeneration. These are examples of the types of products to include in a structured trial.
Data Visualization & Reporting
Clear charts make trends obvious. Recommended visuals:
- Line graph of SIDS for each site over time with baseline highlighted.
- Stacked bar charts showing component contributions (HD, AD, VC, SH, GA) at baseline and endpoint.
- Before/after image panels aligned and cropped identically to show visual coverage changes.
- Table summarizing percentage change, absolute change, and notes on adherence or events like a haircut.
Practical Logs & Adherence Tracking
Keep a short daily or weekly log to record:
- Product application dates and times.
- Shampooing, styling and use of other actives.
- Dietary changes or new supplements.
- Medical events, stress, illness or new medications.
Adherence often explains why two people have different responses to the same product.
Troubleshooting Guide
- No change after 12 weeks: confirm adherence, review application technique and consider switching to a different mechanism of action.
- Improved scalp health but no density gains: prebiotics and anti‑inflammatories often restore scalp ecology first; density may follow with continued use.
- Temporary shedding early in the protocol: common when stimulating follicles; continue and monitor growth activity over the next 8–12 weeks unless shedding is severe.
- New irritation or dermatitis: stop product, photograph the reaction, and consult a dermatologist if symptoms persist or worsen.
Frequently Asked Questions
- How often should I image my scalp? Baseline, 4, 8, 12 weeks and then monthly up to 6 months is a practical cadence.
- Can I use phone photos only? Yes, phone photos with a macro lens and consistent lighting are sufficient for many users.
- Will my data be useful to a clinician? Yes. Well‑documented photos and SIDS scores provide clinicians with objective trends to inform treatment decisions.
Examples of Useful Image Alt Text for SEO
- alt='vertex scalp imaging hair density measurement'
- alt='dermatoscope hair diameter measurement for peptide serum study'
- alt='before after hair density comparison peptide serum prebiotic treatment'
- alt='low level light therapy scalp device usage photograph'
Ethics, Safety & When to See a Professional
This guide is for personal monitoring and non‑diagnostic use. If you experience rapid or patchy hair loss, painful scalp symptoms, pus, severe redness or signs of infection, seek a dermatologist or trichologist. Discontinue any product that causes severe irritation and document the reaction for clinical review.
Extended Example: A 24‑Week Plan and Hypothetical Results
Plan: split‑scalp test with peptide serum on left lateral site, prebiotic on right lateral site, and no treatment at vertex as control. Baseline imaging performed post‑wash 24 hours after shampoo.
Cadence: baseline, 4, 8, 12, 16, 20, 24 weeks. Adherence recorded in log and images taken at consistent time of day.
Hypothetical summary:
- Peptide site: gradual HD increase from 120 to 150 hairs/cm2 by week 24, AD increases slightly, SIDS +22 points overall.
- Prebiotic site: SH and VC improvements by week 8 leading to better perceived coverage; HD increased modestly by week 24, SIDS +12 points.
- Control: small seasonal fluctuation only, SIDS -1 to +2 points.
Conclusion: peptide serum drove density gains while prebiotic quickly improved scalp condition. Combined regimen could be explored in a follow‑up study with crossover design.
Where to Start & Product Resources
If you want to start testing right away, assemble your imaging kit, pick one product to test first and plan your 12–24 week timeline. For product ideas, curated peptide serums and scalp microbiome boosters can be found at specialist retailers. Consider reviewing offerings such as Eelhoe peptide serums and Eelhoe prebiotic scalp treatments which provide examples of product types suited for structured trials.
Final Recommendations
- Start with a baseline image set and commit to at least 12 weeks before judging density outcomes.
- Be meticulous with lighting, angle and scale to keep measurements valid.
- Use the SIDS composite but also report individual components to understand mechanisms.
- Prefer within‑subject split designs for strongest small‑n comparisons.
- Document everything in a log and visualize progress with simple charts.
Conclusion & Invitation
Quantifying your scalp is an achievable and powerful way to turn subjective impressions into objective evidence. With consistent imaging, simple analysis tools and the SIDS framework, you can compare peptide serums, prebiotic scalp treatments and scalp devices sensibly and fairly. This approach helps you make cost‑effective decisions and communicate results to clinicians when needed.
If you are ready to begin testing products, consider exploring focused formulations such as Eelhoe peptide serums and Eelhoe prebiotic scalp treatments. Try one product at a time, follow the imaging protocol in this article and use SIDS to track your progress. Visit Eelhoe to review options and start your evidence‑based journey to healthier scalp and fuller hair.
Appendix: Quick Printable Checklist
- Choose 3 sites and mark them.
- Set up tripod, macro lens and ring light.
- Include 1 cm ruler in every image.
- Use fixed camera settings and white balance.
- Take 3 images per site and store with dated filenames.
- Log product use and external factors weekly.
- Analyze with ImageJ and update SIDS spreadsheet at each timepoint.
Good luck, and may your measurements be consistent and your results revealing.
اترك تعليقًا
تخضع جميع التعليقات للإشراف قبل نشرها.
This site is protected by hCaptcha and the hCaptcha Privacy Policy and Terms of Service apply.